Setting up an empty JVM based project
In this chapter we will setting up a simple JVM based Fly-Ko-Lib project with Intellij IDE for desktop targets like Windows, Mac and Linux. This will give you a quick start to go directly into coding and a setup to learn and experiment with the Fly-Ko-Lib just right away. So lets start directly with Intellij IDE and make sure you already have installed the Kotlin plugin on the latest version.
In your Intellij IDE go to the File menu, New and choose Project

Firefly JVM Project Setup - Setup Dialog
In the setup dialog select Kotlin Multiplatform. Name your project and use Library from the Multiplatform section (or Console Application if you want to setup a desktop only project) This guide will use Gradle Kotlin for building the project so we recommend to stick with that. The JDK version here is not that important at the moment. Just stick with your favorite JDK version.
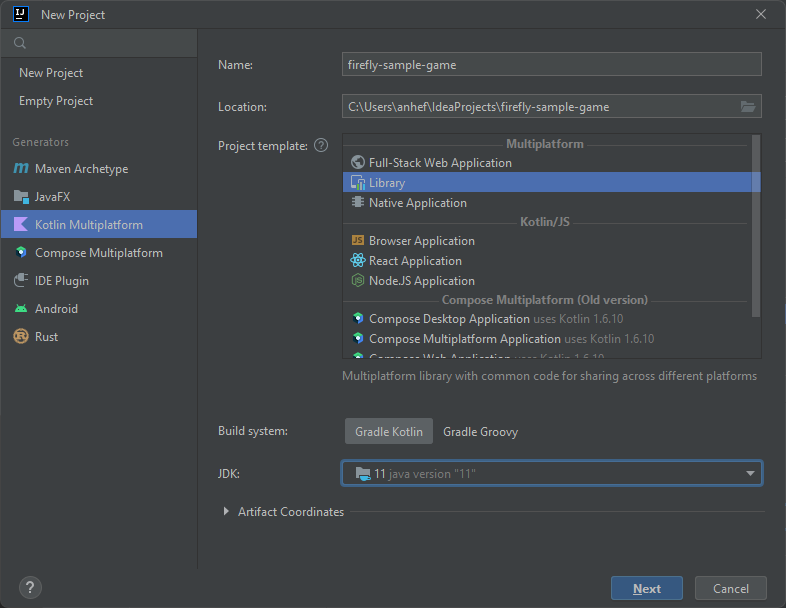
Firefly JVM Project Setup - Setup Dialog
Click next and remove the js and native target from the target list

Firefly JVM Project Setup
Then click on Finish To create the empty project. You should get something like the following:
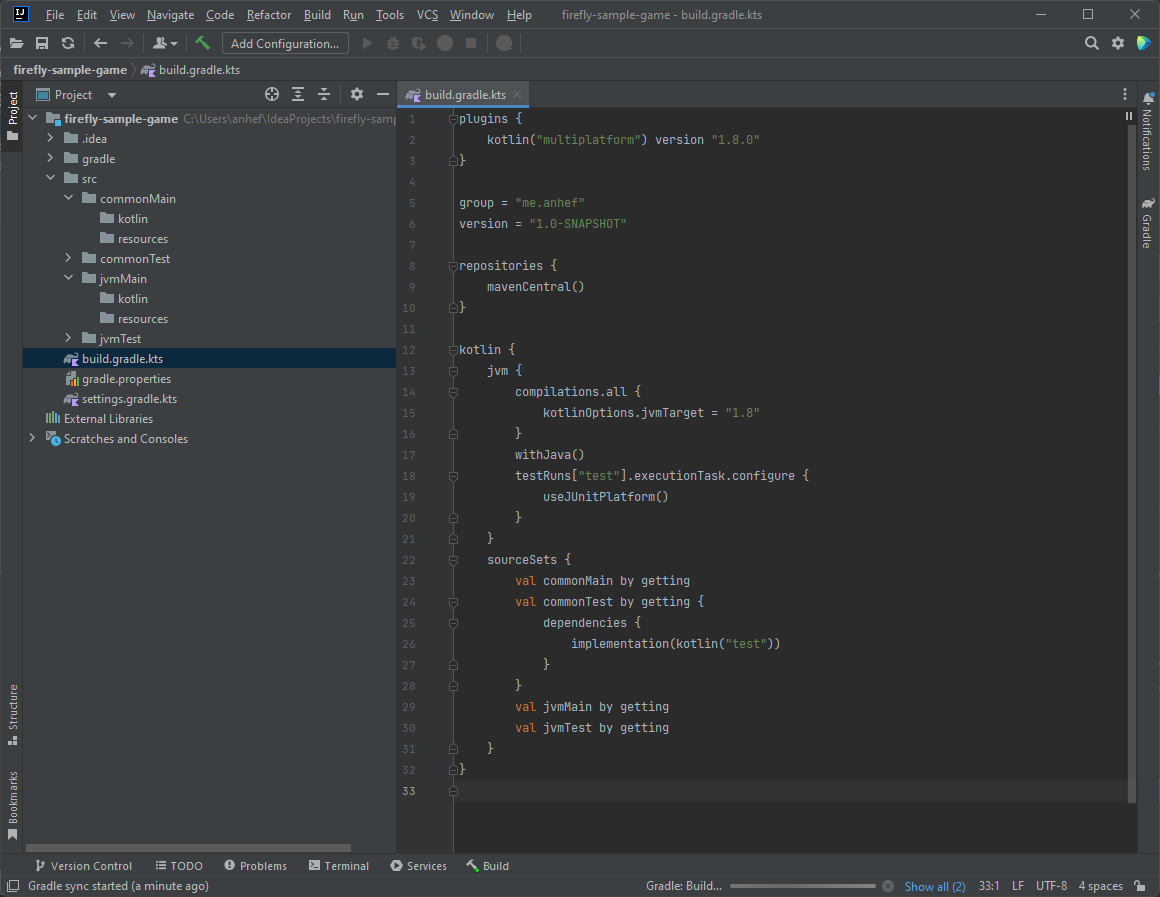
Firefly JVM Project Setup - Empty Project
The commonMain directory is the place for all your common code that shall and can be shared for different targets. You also have a testing space there for common code if you need it. If not, you can just delete it and also do do in the gradle build file.
The jvmMain directory is the place for all device target specific code, where you can write your. Also here you have a test space that can be deleted if you want so. Within the different source and test folders you get the usual kotlin project setup with a source (kotlin) for code and a resource directory for your resources.
Now we have to import the Firefly Kotlin Library (Fly-Ko-Lib) for the project to get ready for coding games. To do so please open the build.grandle file. We need to add the Fly-Ko-Lib Maven repository to allow gradle to pull the library. Fly-Ko-Lib uses jitpack.io so we add it to the repositories in the gradle build file.
repositories {
    mavenCentral()
    maven ( url = "https://jitpack.io" )
}
Now in the kotlin sourceSets section you can define your dependencies per source set. Here you have to add the Fly-Ko-Lib dependencies for every source target you need. For your example we need to declare it for the commonMain target:
val commonMain by getting {
    dependencies {
        implementation("com.github.AndreasHefti.flyko-lib:flyko-lib:0.3")
    }
}
Make sure you get the latest stable version of Fly-Ko-Lib. For your example we need this also for the jvmMain target:
val jvmMain by getting {
    dependencies {
        implementation("com.github.AndreasHefti.flyko-lib:flyko-lib:0.3")
    }
}
Trigger a rebuild with grade to get all the dependencies. You should be able to see them in the External Libraries section for your project tree. You should now get something like this:

Firefly JVM Project Setup - Finished Setup
If this is done we are yet ready for coding. Now you are ready to build, run and debug our code easily within the IDE.
Note
If you want to build also for other targets, Android for example you need to extend your setup within the gradle build and according to Kotlin Multiplatform conventions. You might also need to implements some target specific adapters and interfaces. But this is not part of this tutorial and also not tested yet.
So Let’s start with just a Fly-Ko-Lib game window showing the standard inari brand intro. To do so you navigate to the jvmMain directory and create a new Kotlin file “IntroTest.kt” for example. Then add the following code to the file:
import com.inari.firefly.DesktopApp
import com.inari.firefly.core.api.DesktopAppAdapter

fun main() {
    DesktopApp("IntroTest", 800, 600) {
        DesktopAppAdapter.exit()
    }
}
The code is very simple. We just open a game window with the resolution of 800 to 600 pixels that shows the inari brand into before calling your code. Then the code just exists and closes the window.
Note
The inari brand into is implemented by the library and by the used DesktopAppAdapter and will appear on application start for default. Just use any key or mouse button to skip the intro.
For completion, you should now have something like the following in yor IDE. And after starting the application the game window with the inari brand intro shall appear:

Firefly JVM Project Setup - First Desktop App

Firefly Desktop App with Inari Intro
So, we are done with the setup, congratulation!
In the next chapter we will see how to build and package a game for desktop targets within different ways up to executable packaging and file size optimization.